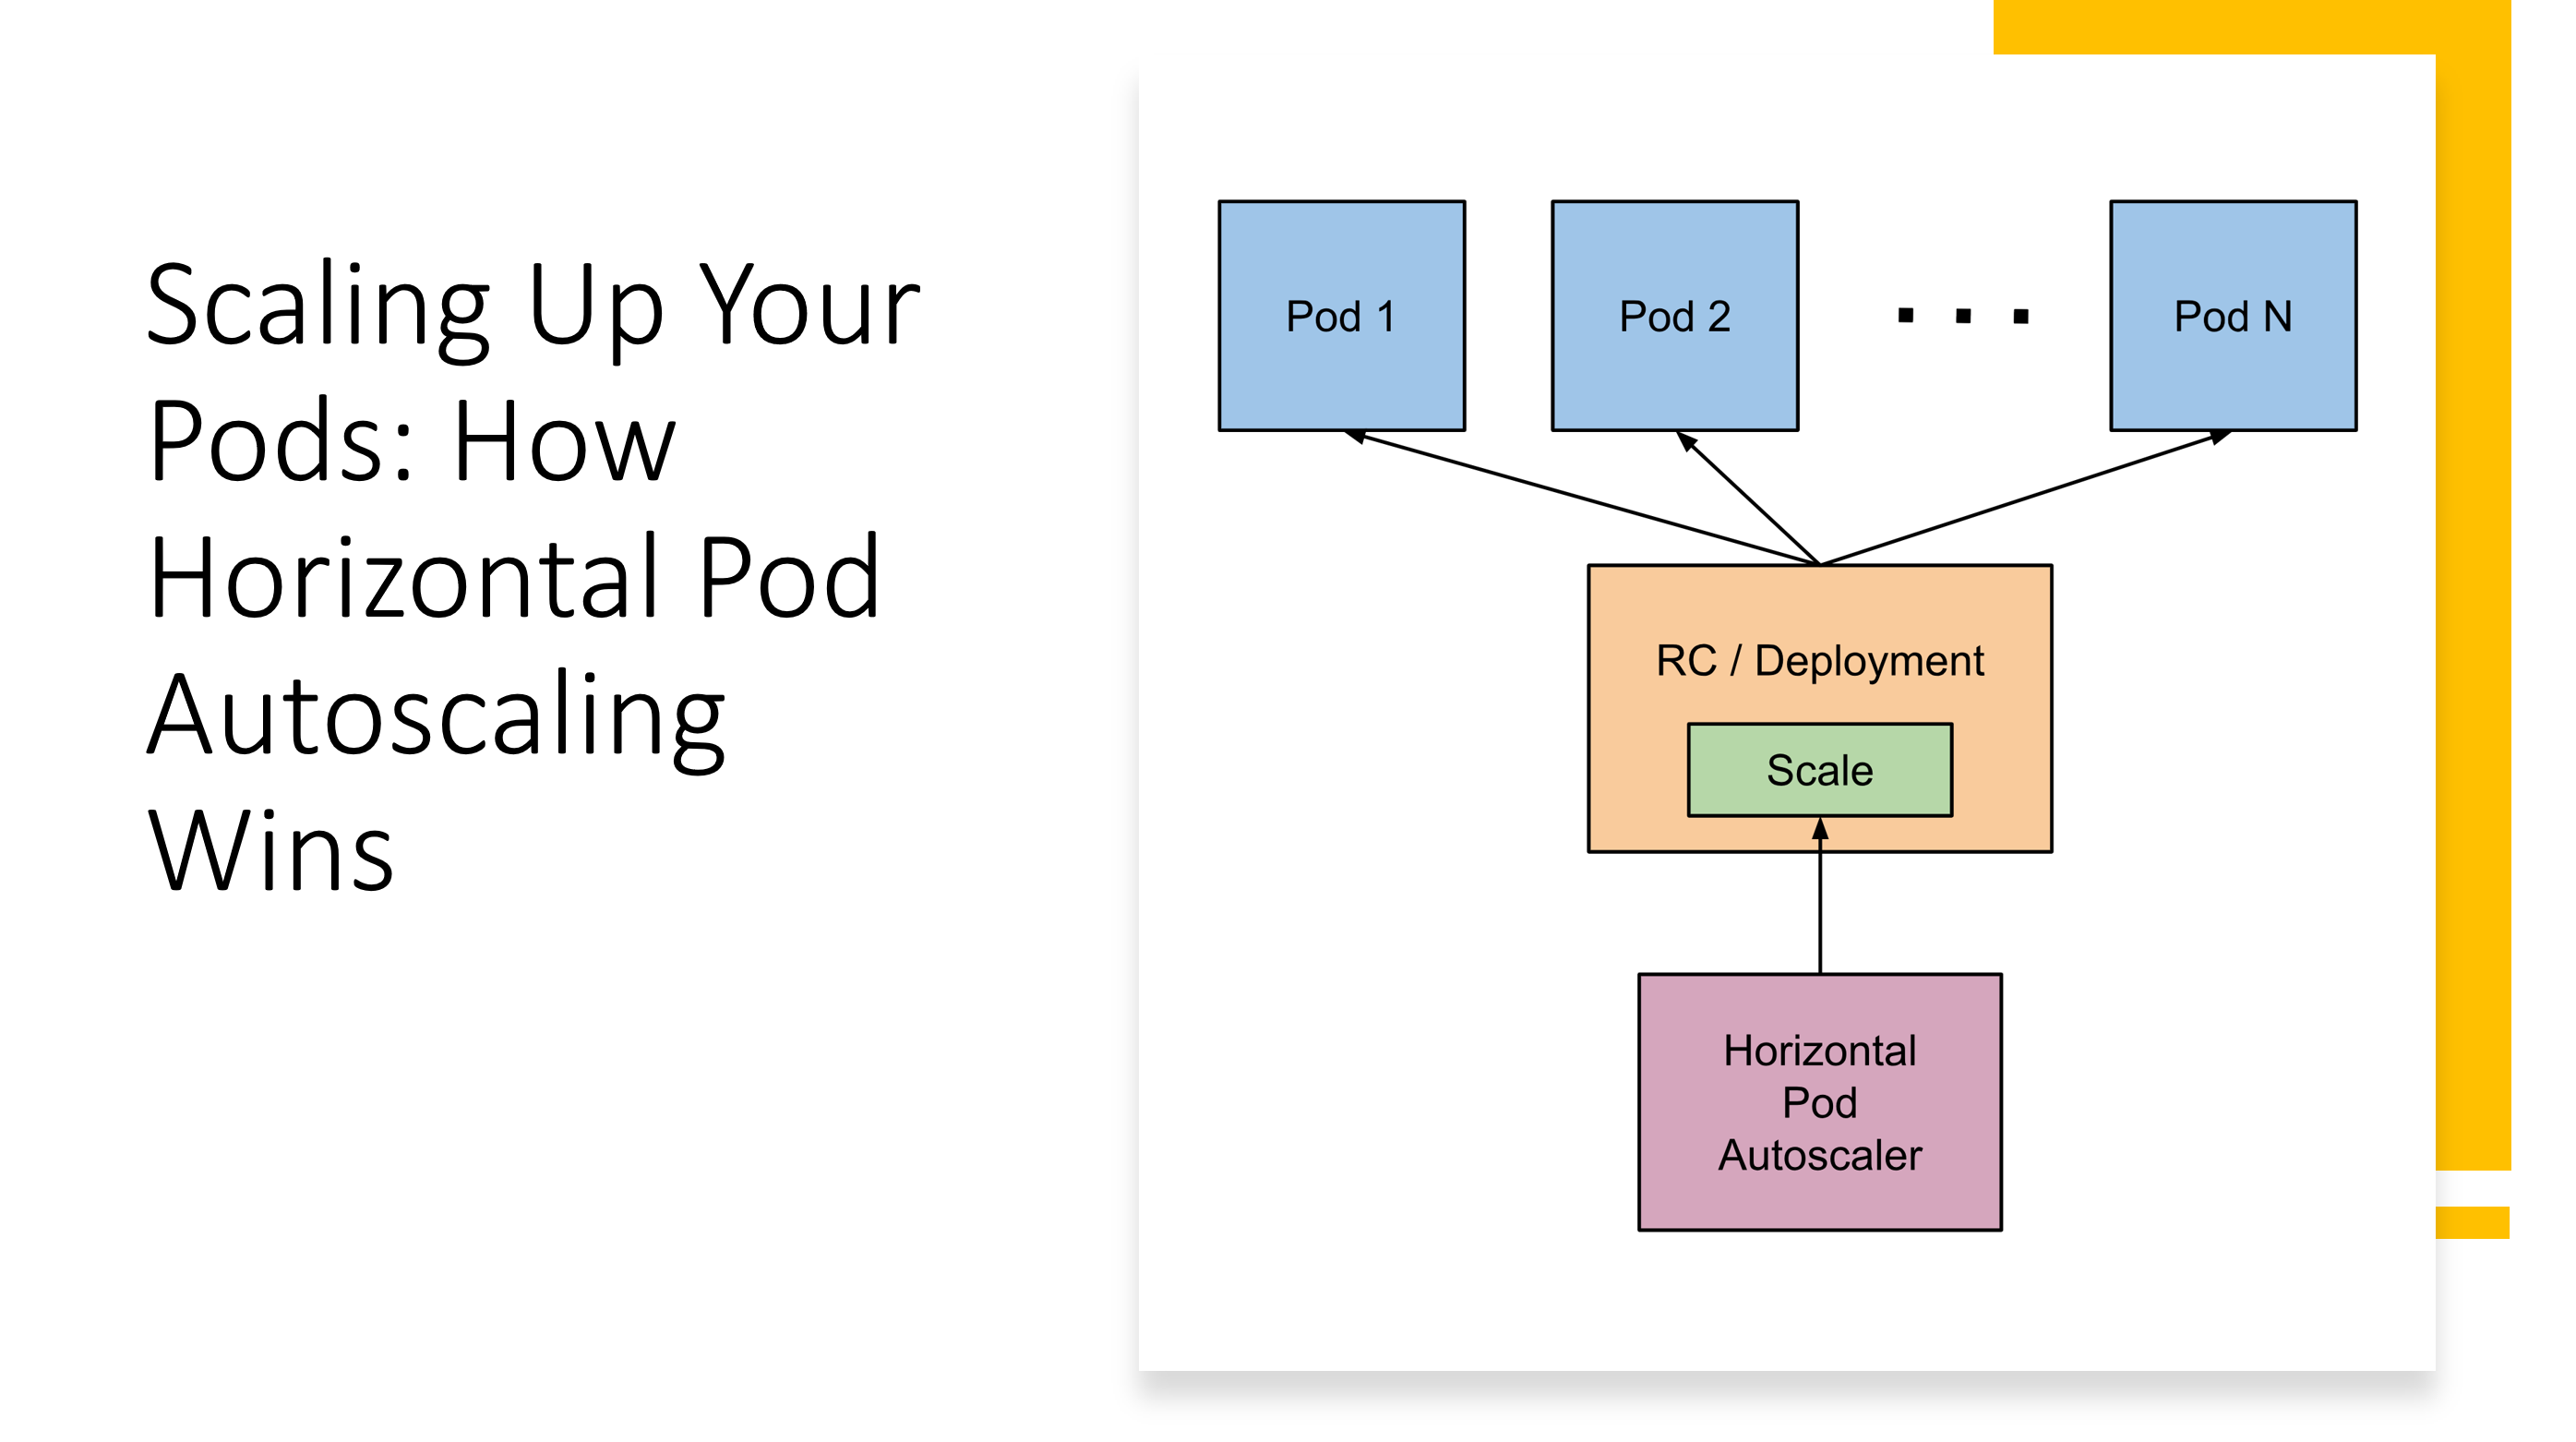
In the dynamic world of containerized applications, ensuring your deployments can handle fluctuating workloads is crucial. Kubernetes offers built-in mechanisms for scaling, and while replica sets are a foundational tool, horizontal pod autoscaling (HPA) takes it a step further. This article explores HPA and how it elevates pod management compared to traditional replica sets.
Replica Sets: Setting the Stage
Replica sets are Kubernetes workhorses, guaranteeing a desired number of pod replicas running at any given time. They’re perfect for maintaining baseline application availability. But what if traffic spikes? Manually adjusting replicas to meet demand can be cumbersome and reactive.
Enter HPA: Automating Scale for Efficiency
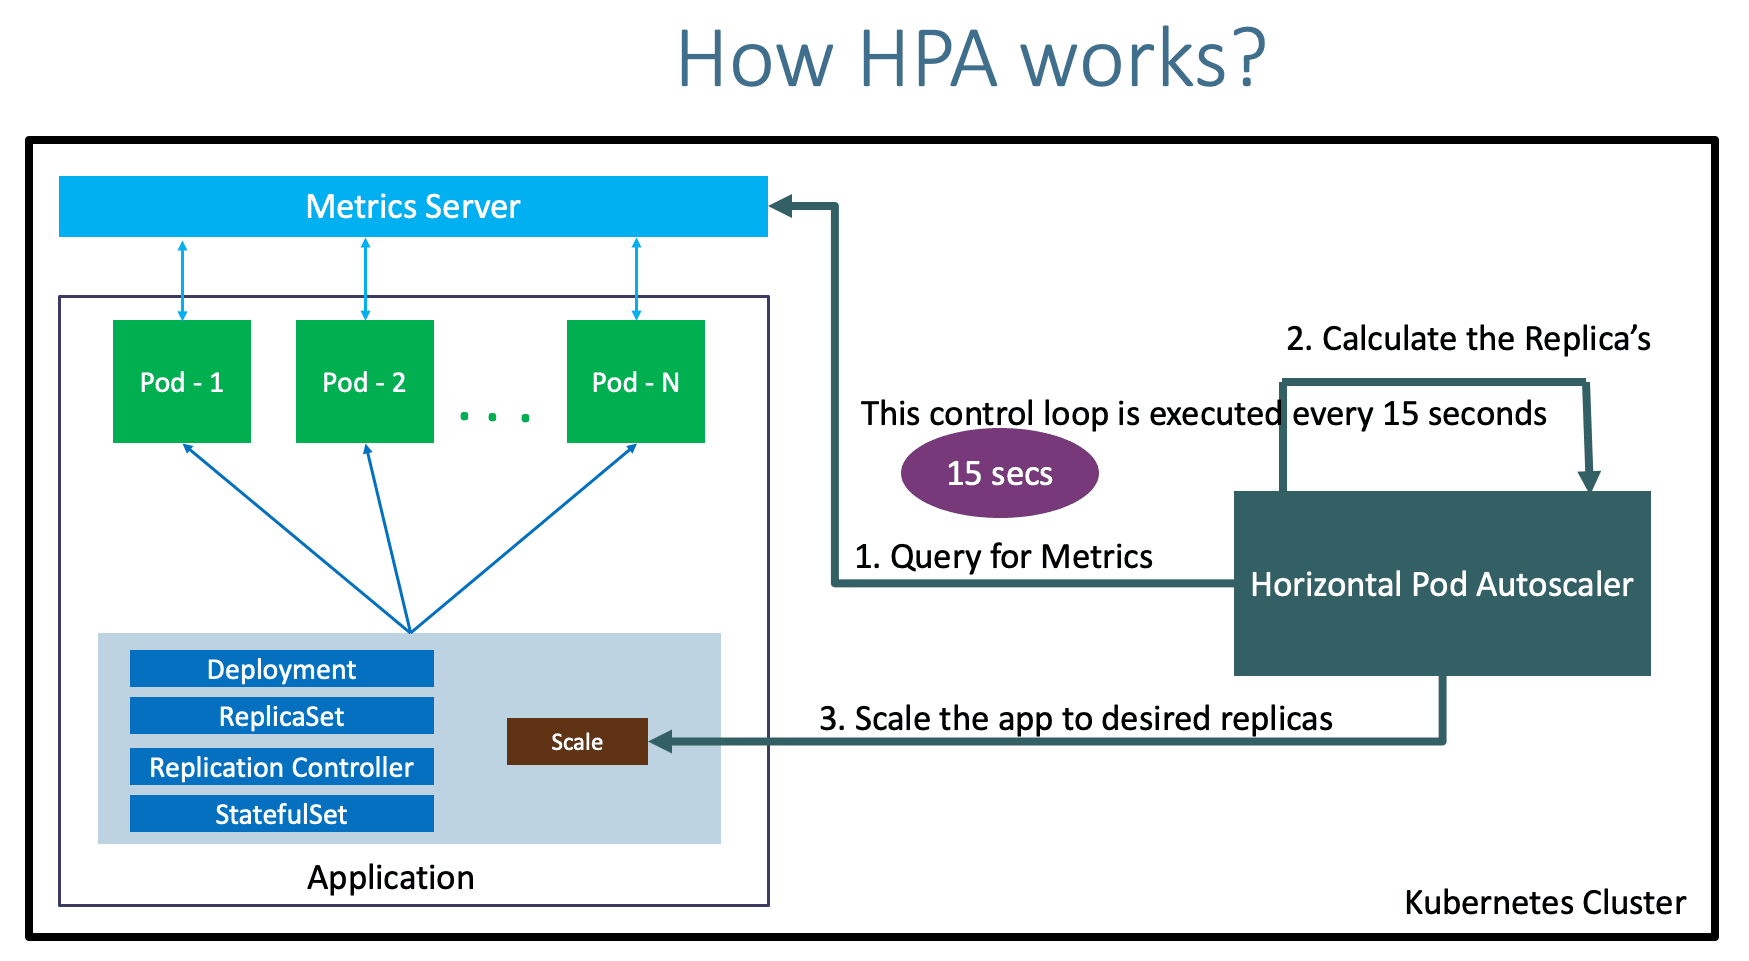
HPA introduces intelligent, automated scaling. It continuously monitors metrics like CPU or memory usage of your pods. When these metrics breach predefined thresholds, HPA springs into action. If resource consumption surges, HPA automatically scales the replica set up by spawning new pods. Conversely, during low-traffic periods, HPA scales down by gracefully terminating pods, optimizing resource allocation.
HPA’s Advantages over Replica Sets
HPA offers several compelling benefits over static replica sets:
- Dynamic Scaling: HPA reacts to real-time metrics, ensuring your application has the resources it needs, when it needs them.
- Cost Optimization: By scaling based on demand, HPA prevents over-provisioning of resources, leading to cost savings.
- Improved Performance: HPA ensures your application maintains optimal performance by preventing resource starvation during peak loads.
- Reduced Operational Overhead: HPA automates scaling decisions, freeing you from manual adjustments and reactive management.
[Image Courtesy: https://www.stacksimplify.com/]
Beyond CPU and Memory: Custom Metrics for Granular Control
HPA isn’t limited to CPU or memory. You can define custom metrics exposed by your application for even more granular control. This allows HPA to scale based on factors specific to your application’s health, like queue depth or response times.
Conclusion: HPA – The Evolving Workload Manager
While replica sets provide a foundation for pod management, HPA adds a layer of automation and intelligence. By dynamically scaling based on real-time metrics, HPA ensures optimal resource utilization, application performance, and cost efficiency. As containerized deployments become more complex, HPA will undoubtedly become an essential tool for managing and scaling your pod
Scaling a Demo Nginx App with HPA in Kubernetes
Here are two examples of implementing HPA for a simple Nginx demo app in Kubernetes:
Example 1: Scaling based on CPU Usage
This example uses CPU utilization as the metric for scaling.
- Deployment YAML:
apiVersion: apps/v1
kind: Deployment
metadata:
  name: nginx-demo
spec:
  replicas: 1
  selector:
    matchLabels:
      app: nginx-demo
  template:
    metadata:
      labels:
        app: nginx-demo
    spec:
      containers:
      - name: nginx
        image: nginx:latest
        resources:
          requests:
            cpu: 100m
            memory: 64Mi
          limits:
            cpu: 500m
            memory: 256Mi
- HPA YAML:
YAML
apiVersion: autoscaling/v2
kind: HorizontalPodAutoscaler
metadata:
  name: nginx-demo-hpa
spec:
  scaleTargetRef:
    apiVersion: apps/v1
    kind: Deployment
    name: nginx-demo
  minReplicas: 1
  maxReplicas: 5
  metrics:
  - type: Resource
    resource:
      name: cpu
      target:
        type: Utilization
        averageUtilization: 80
Explanation:
- The deployment defines a single Nginx replica with resource requests and limits.
- The HPA object references the deployment and sets minimum and maximum replicas (1-5).
- The HPA monitors CPU utilization. If average CPU usage goes above 80% for a period (default 15 seconds), it scales the deployment up by adding a new pod. Conversely, if CPU usage falls below a certain threshold, it scales down.
Example 2: Scaling based on Custom Nginx Metric
This example leverages the Nginx Status module to expose a custom metric for scaling.
Preparation:
- Configure your Nginx container to expose the Status module with the
activeconnections metric. You can achieve this by adding the following configuration to your Nginx container definition:
YAML
      nginx:
        ...
        volumeMounts:
        - name: nginx-conf
          mountPath: /etc/nginx/conf.d
        ...
- Create a configmap named
nginx-confcontaining a file nameddefault.confwith the following content:
http {
  server {
    listen 80;
    location / {
      # ... other configurations
    }
    # Add this block to expose active connections metric
    server_status on;
  }
}
- Deploy the configmap with
kubectl create configmap nginx-conf --from-file=default.conf.
HPA with Custom Metric:
apiVersion: autoscaling/v2
kind: HorizontalPodAutoscaler
metadata:
  name: nginx-demo-hpa
spec:
  scaleTargetRef:
    apiVersion: apps/v1
    kind: Deployment
    name: nginx-demo
  minReplicas: 1
  maxReplicas: 5
  metrics:
  - type: External
    external:
      metricName: nginx_active
      metricSelector:
        matchLabels:
          app: nginx-demo
      target:
        type: Utilization
        averageUtilization: 80
Explanation:
- This HPA uses the
Externalmetric type. - It defines a custom metric named
nginx_active. - The
metricSelectorspecifies a label (app: nginx-demo) to identify pods exposing the metric. - This example assumes a custom exporter scrapes the Nginx Status endpoint and exposes the
nginx_activemetric to the HPA controller.
These are just basic examples. Remember to choose the metric that best reflects your application’s workload and adjust the scaling thresholds based on your needs.
References
https://kubernetes.io/docs/tasks/run-application/horizontal-pod-autoscale-walkthrough/
https://kubernetes.io/docs/tasks/run-application/horizontal-pod-autoscale/
Related Posts
 Achieving DevOps Harmony: Building and Deploying .NET Applications with AWS Services
 Harnessing AWS CDK for Python: Streamlining Infrastructure as Code
 Mastering AWS EKS Deployment with Terraform: A Comprehensive Guide
 A Comprehensive Guide to Provisioning AWS ECR with Terraform
 Introduction to Site Reliability Engineering (SRE) in Azure: Achieving Higher Reliability with AKS and Essential Tools
- Mastering AWS, EKS, Python, Kubernetes, and Terraform for Monitoring and Observability for SRE: Unveiling the Secrets of Cloud Infrastructure Optimization